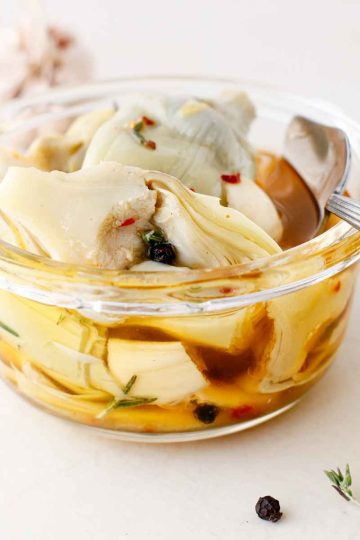
Pickled Turmeric

4 ingredients, no oil and just 10 minutes in the kitchen is all you need to make this easy Pickled Turmeric. Get ready to capture and enjoy the earthy, peppery flavor of fresh turmeric root in this easy condiment that's perfect to serve with almost any Indian meal.
If you loved the spicy, tangy flavors of my green chili pickle, you're going to love this recipe too!

Turmeric is a staple in Indian cooking. You'll find this anti-inflammatory powerhouse used widely in everything from curries and soups to seasonings and condiments.
It's usually dried and ground into a powder to make it convenient to use- I used it to make my turmeric ginger honey (perfect for the flu season) and my golden milk paste (to make a soothing bedtime drink). This time, when I found some fresh ginger on my trip to the supermarket, I knew I just HAD to put it to use and try making this pickle.
Jump to:
What's So Great About the Recipe?
Pickled turmeric is spicy, tangy and salty and packs in a lot of textures too. It's really a treat for your taste buds. If you love Indian food and enjoy its savory and aromatic flavors, this condiment is a must try.
It's super easy to make, and needs very few ingredients- just like my curry pickled cauliflower- another Indian-inspired quick pickle.
Recipe Ingredients

Turmeric root: I used two kinds of raw turmeric roots here- the white and the orange ones, in equal proportions. You could use any one of the two.
Lime juice: For that sour, tangy flavor. This also helps preserve the turmeric.
Green chilies: For that spicy kick. Feel free to skip these if you can't tolerate the heat.
Sea salt: Sea salt is the best, especially for pickling. I always use it when I make my curry pickled cauliflower.
See recipe card for quantities.
Substitutions & Variations
- If you can't find fresh limes, use bottled lime juice. Lemon juice can also work in a pinch, but it's best to use fresh lemon juice.
- If you can't find both, vinegar can be a good alternative- I used it for my Persian Torshi recipe too, and it worked super well. Stick to using the classic white vinegar here and let the flavors of the turmeric shine.
- If you want to bring in another layer of flavor to this turmeric pickle, add some fresh ginger root into the mix too!
How to Make Pickled Turmeric

Step 1: Peel and slice the turmeric into thin rounds. Chop the chilies into bite sized chunks.

Step 2: Add to a bowl. Top with lots of lime juice and salt. Mix well.
Step 3: Transfer the contents to a glass jar and refrigerate.
💭Top Tip
Use a mandolin slicer to cut the turmeric into perfect thin slices. I did the same when I made my quick pickled radishes.

Tips & Tricks to Nail the Recipe
- I love these little rounds, but if you want, you can also julienne the turmeric. This can be a bit tough to do, since turmeric root is quite tough, but this version can soak up the flavors more quickly. I did the same with my pickled shredded carrots and I found that the thin juliennes absorb the flavors more rapidly.
- Another great idea is to chop the turmeric into small cubes.
- Make sure you peel the turmeric well and wash and pat dry them before you use them for the recipe. This will help keep them from spoiling quickly.
- Pickled turmeric tastes best when consumed 2-3 days after you make it. Raw turmeric can have an intense taste and flavor, which mellows down with time. I would recommend making this a few days ahead of time, and then enjoying it.
- If you don't have enough lime juice to keep all the turmeric and green chilies covered, use a spoon to move the turmeric around or just shake the jar occasionally. This will help prevent spoilage.
How to Serve Pickled Turmeric
Enjoy this pickled turmeric as a condiment with some classic Indian flatbreads like rotis and parathas, or serve it as a side with a hearty Indian meal of dal, rice and a salad.
On rushed days, I whip a quick curry using my Tikka Masala sauce as the base, make some steamed rice, and serve this pickle on the side- ahh... it's such a treat!

Recipe FAQs
You can add ginger or carrot chunks (or sticks) into the turmeric pickle if you have them at hand. Or just whip up a quick ginger carrot pickle.
Store the leftover turmeric pickle in a clean glass jar with an airtight lid in the refrigerator. It should stay fresh for 7-10 days, possibly longer. Make sure you keep it refrigerated at all times, and close the lid as soon as you're done using it. Also, use a clean, dry spoon to spoon it out- you don't want any bacterial contamination.
Related Recipes
Looking for other recipes like this? Try these:


If you tried this Pickled Turmeric or any other recipe on my website, please leave a 🌟 star rating and let me know how it went in the 📝 comments below. Thanks for visiting!

Pickled Turmeric
Ingredients
- 200 g raw turmeric
- 2-3 green chilies
- ½ cup lime juice
- 1 tablespoon sea salt
Instructions
- Peel and slice the turmeric into thin rounds. Chop the chilies into bite sized chunks.
- Add to a bowl. Top with lots of lime juice and salt. Mix well.
- Transfer the contents to a glass jar and refrigerate.
Notes
- I love these little rounds, but if you want, you can also julienne the turmeric. This can be a bit tough to do, since turmeric root is quite tough, but this version can soak up the flavors more quickly. I did the same with my pickled shredded carrots and I found that the thin juliennes absorb the flavors more rapidly.
- Another great idea is to chop the turmeric into small cubes.
- Make sure you peel the turmeric well and wash and pat dry them before you use them for the recipe. This will help keep them from spoiling quickly.
- Pickled turmeric tastes best when consumed 2-3 days after you make it. Raw turmeric can have an intense taste and flavor, which mellows down with time. I would recommend making this a few days ahead of time, and then enjoying it.
- If you don't have enough lime juice to keep all the turmeric and green chilies covered, use a spoon to move the turmeric around or just shake the jar occasionally. This will help prevent spoilage.