
Pickled Brussels Sprouts
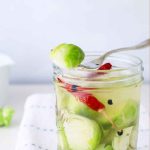
Use up all those extra Brussels sprouts to make these crunchy and tangy pickled Brussels sprouts - perfect as a side or on your charcuterie board.
These little delights taste wonderful when paired with pretty much any roasted meat, in a sandwich (just like my pickled red cabbage) and even when featured on a holiday grazing table.

We're a pickle-loving household, and that all started with my curry pickled cauliflower recipe. We finished up the entire jar in a few days, and after that, I just HAD to try and experiment with some more veggies that I could pickle.
Of course, I almost always have my pickled turmeric and green chili pickle at hand thanks to my Indian roots- I really wanted to try pickling a different veggie this time. And that's when I thought of this quick pickle recipe.
Jump to:
What's So Great About the Recipe?
The simplicity of this recipe is what makes it such a huge hit. You'll just need a few minutes in the kitchen and a couple of pantry staples to make a nice batch of these pickled sprouts.
I especially love making this during the holidays- just like my pickled cherries and pickled rhubarb.
Recipe Ingredients

Brussels sprouts: You'll need fresh, unblemished and ripe Brussels sprouts.
Apple cider vinegar: For that beautiful fruity tanginess. You can also use white vinegar if you want to though.
Garlic: For that pungent, savory flavor. I used it for my pickled radish recipe too!
Spices: I used a mix of black peppercorns, a dried red chili and a mix of some dill seeds and carom seeds.
Sea salt: Best for pickling. You can also use pink salt if you have it at hand.
See recipe card for quantities.
Substitutions & Variations
- Don't have fresh garlic? Ginger is your next best bet! Slice fresh ginger into matchsticks- just like I did when I made my carrot ginger pickle, and add it in for that flavor kick.
- For extra heat, you can also add sliced jalapenos or dehydrated jalapenos into the mix. I love using red cayenne chilies sometimes- just like I did when I made my preserved chilies in oil.
- Mustard seeds, crushed red pepper flakes, bay leaves, cloves and fennel seeds are all excellent additions to consider adding to the pickling liquid.
How to Make Pickled Brussels Sprouts

Step 1: Start by chopping up the Brussels sprouts. I cut them in halves but you can quarter them too, if that's what you prefer.

Step 2: Blanch them in boiling water for a couple of minutes and then remove and add them to an ice bath.

Step 3: Drain the excess water, pat dry and transfer them to a glass jar along with the spices.

Step 4: Prepare a brine using equal parts apple cider vinegar and water along with the salt, and pour the hot brine into the jar.
💭Top Tip
Don't forget to trim the base of the Brussels sprouts before you chop them up. Remove the excess portion where the base was attached to the stalk, and then use the sprouts for the recipe.

Tips & Tricks to Nail the Recipe
- Make sure the Brussels sprouts are completely clean and free from any dirt. This is especially if you're using homegrown sprouts.
- It also helps if you remove the first outer layer of the sprouts. These tend to be more tough and hard than the rest of the veggie.
- I kept the brine tangy and salty, but if you really love a balanced flavor, you can also add a tablespoon of sugar into the pickling liquid. I did that when I made my quick pickled shallots and pickled eggs and sausage.
- Make sure there's enough of the pickling liquid aka brine to completely cover all the Brussels sprouts. This is crucial, as it helps prevent spoilage.
- In addition to Brussels sprouts, you can also add other veggies like carrots, cauliflower, asparagus and onions to the mix, and turn it into a mix veggie pickle. I did the same when I made my Torshi Makhloot.
- Allow the jar to rest overnight in the refrigerator for the sprouts to soften and soak up the flavors nicely, and then serve.
How to Serve Pickled Brussels Sprouts
Enjoy these pickled Brussels sprouts as a snack or a side with any grilled or roasted meat, or chop them up and use them as a topping over some crostini along with some flaky tuna.
I love featuring these on my holiday charcuterie board along with my marinated feta and olives and my spicy pickled garlic.
And of course, you can also add these to your grain and rice bowls or sneak them into your wraps and sandwiches for an extra burst of flavor and texture.

Recipe FAQs
You can store your pickled Brussels sprouts for up to 2 weeks in the refrigerator, or longer if you're properly canning them. Make sure you allow it to cool down completely before you refrigerate it and use a clean and dry jar to store it.
You can, but I would highly recommend taking the few extra minutes to do it. Blanching helps remove the 'rawness' of the sprouts, softens them and gets them to absorb the flavors from the brine much better.
Pickled veggies are best made using fresh veggies. Frozen veggies tend to release a lot of water, and the additional moisture can quickly spoil them, so I wouldn't recommend it.
More Preserve Recipes
Looking for other recipes like this? Try these:


If you tried this pickled Brussels sprouts recipe or any other recipe on my website, please leave a 🌟 star rating and let me know how it went in the 📝 comments below. Thanks for visiting!

Pickled Brussels Sprouts
Ingredients
- 2 cups Brussels sprouts
- 2-5 garlic
- ½ teaspoon dill seeds
- ½ carom seeds
- 1 cup apple cider vinegar
- 1 teaspoon black peppercorns
- 1-2 dried red chili
- 1 tablespoon sea salt
Instructions
- Start by chopping up the Brussels sprouts. I cut them in halves but you can quarter them too, if that's what you prefer.
- Blanch them in boiling water for a couple of minutes and then remove and add them to an ice bath.
- Drain the excess water, pat dry and transfer them to a glass jar along with the spices.
- Prepare a brine using equal parts apple cider vinegar and water along with the salt, and pour the hot brine into the jar.
Notes
- Make sure the Brussels sprouts are completely clean and free from any dirt. This is especially if you're using homegrown sprouts.
- It also helps if you remove the first outer layer of the sprouts. These tend to be more tough and hard than the rest of the veggie.
- I kept the brine tangy and salty, but if you really love a balanced flavor, you can also add a tablespoon of sugar into the pickling liquid. I did that when I made my quick pickled shallots and pickled eggs and sausage.
- Make sure there's enough of the pickling liquid aka brine to completely cover all the Brussels sprouts. This is crucial, as it helps prevent spoilage.
- In addition to Brussels sprouts, you can also add other veggies like carrots, cauliflower, asparagus and onions to the mix, and turn it into a mix veggie pickle. I did the same when I made my Torshi Makhloot.
- Allow the jar to rest overnight in the refrigerator for the sprouts to soften and soak up the flavors nicely, and then serve.


