
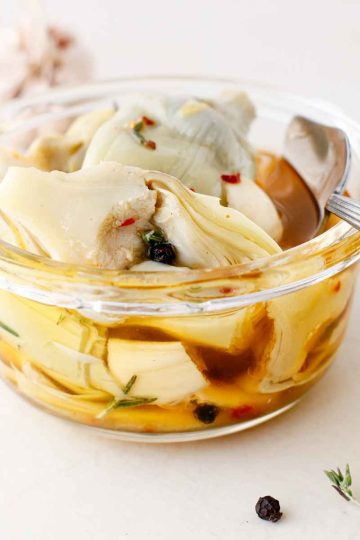
Preserved Chilies in Oil

These Italian-style preserved chilies in oil are bursting with flavor, and can jazz up so many dishes. Use them to top your pizzas and pastas or layer them into your simple sandwiches and even your breakfast avocado toast!
All you'll need is a few simple ingredients and minutes of kitchen time to put this together- just like my quick pickled shallots!

Pickling and preserving foods is probably my oldest obsession. My pantry and refrigerator are almost always stocked with everything from pickled cherries and pickled mixed vegetables to my newest favorite spicy pickled garlic.
This time, I decided to try something with just chilies- something hot and spicy, and here we are!
Jump to:
- What's So Great About the Recipe?
- Ingredients For the Preserved Chiles in Oil Recipe
- Substitutions & Variations
- How to Make Preserved Chiles in Oil
- 💭Top Tip
- How to Store the Leftover Oil Preserved Chilies
- Tips & Tricks to Nail the Recipe
- How to Use the Preserved Chilies
- Related Recipes
- Preserved Chilies in Oil
What's So Great About the Recipe?
I love how versatile the recipe is! The spicy chilies make for the perfect topping for almost anything you like- from soups and stews to sandwiches, wraps, burgers, and even in salads.
You can also team them up with some quick pickled radishes or Torshi Makhloot (mixed vegetable pickle).
Ingredients For the Preserved Chiles in Oil Recipe
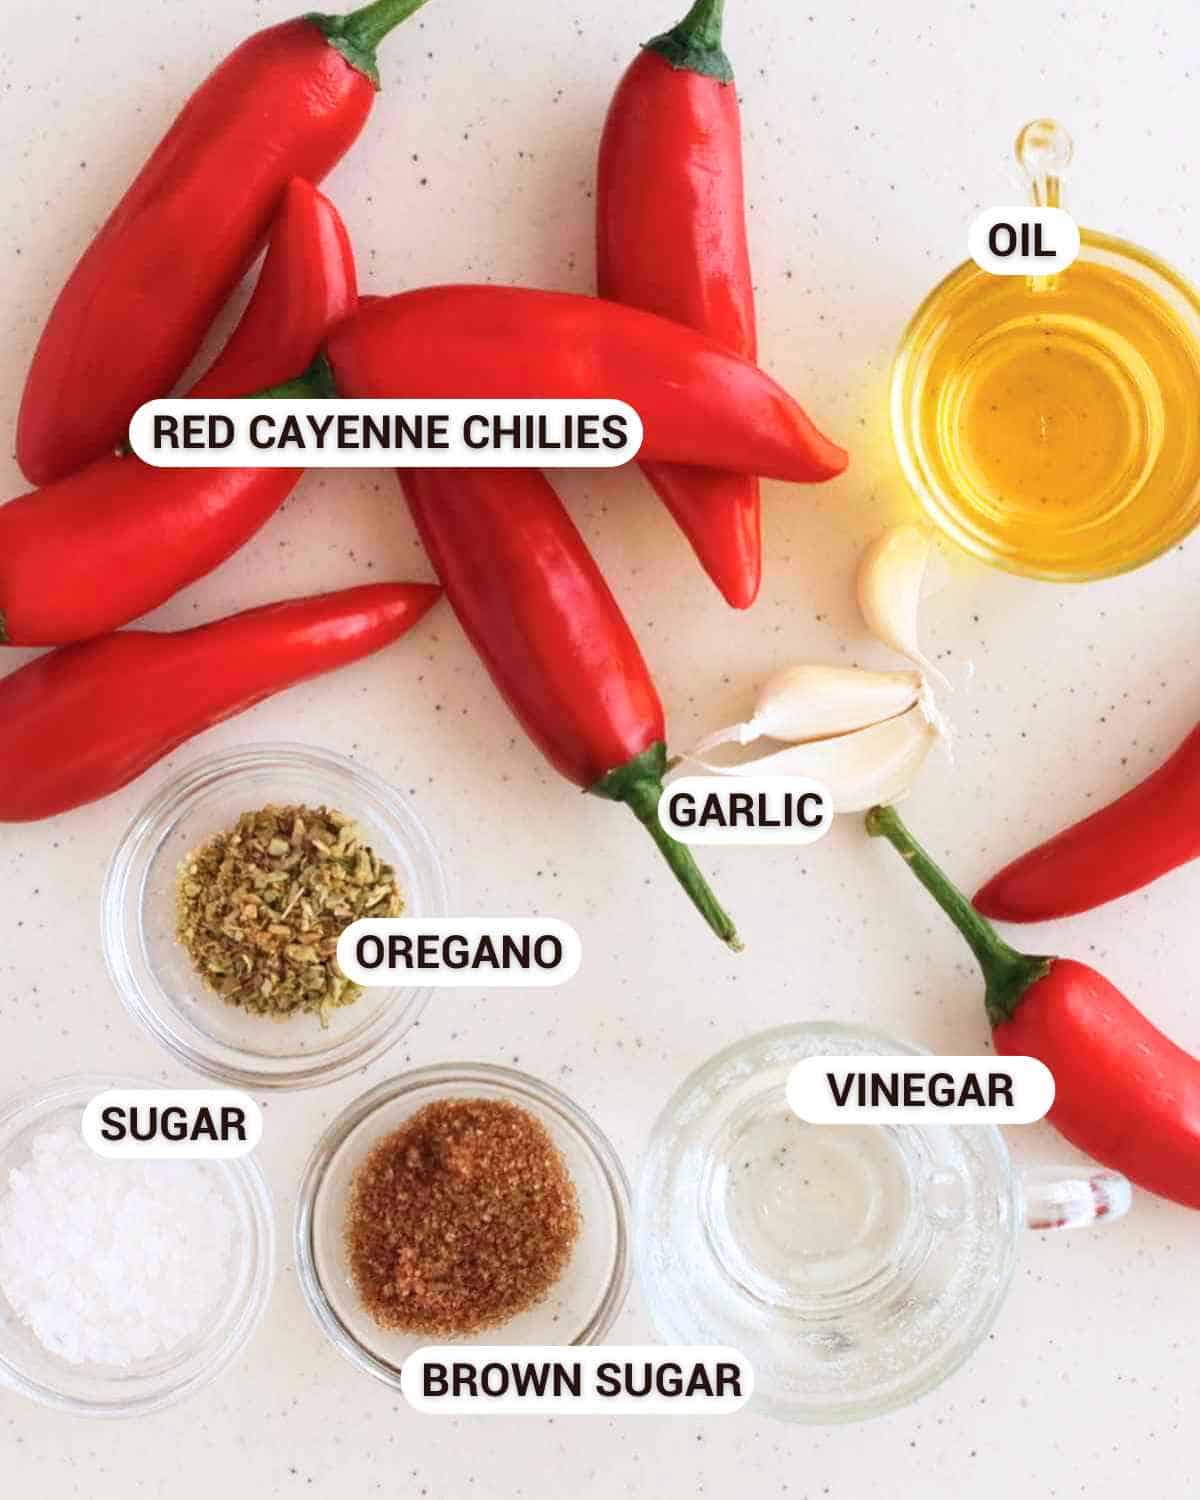
Chilies: I used red cayenne chilies here, but you could try using almost any other kind of chili as well. A mix of two different kinds of chilies is a great idea too!
Brown sugar: To tone down the intense heat of the preserved chiles, I used a bit of brown sugar. Use white sugar if you don't have this.
Garlic: Garlic seriously makes everything better. Add as much as you want to.
Vinegar: To help pickle and preserve the chiles, I used white vinegar, but apple cider vinegar is a great option too.
Oil: Use olive oil or extra virgin olive oil. This is again, helpful in preserving the chilies.
Oregano: This one's optional, but I would highly recommend adding just a bit of oregano to amp up the flavors of this preserved chiles mixture.
See recipe card for quantities.
Substitutions & Variations
- Swap the cayenne I used here for habaneros if you prefer something extra hot and spicy, or jalapenos or any other subtle-flavored chilies if you prefer something more toned-down.
- Add whole peppercorns into the mix to bring in another layer of flavor.
How to Make Preserved Chiles in Oil

Step 1: Wash the chilies nicely and pat them dry.

Step 2: Thinly slice them using a sharp knife and set them aside.

Step 3: Combine vinegar and salt in a non-reactive bowl. Add the chilies and garlic and cover the bowl with cling wrap. Set this aside for a few hours.

Step 4: Drain the vinegar and pack the chilies with the garlic in a glass jar. Pour in the olive oil until all the chilies are covered.
💭Top Tip
Wear gloves while handling the chiles, or rub your palms with some oil before you begin slicing. This will keep the heat from the chilies from burning your hands.

How to Store the Leftover Oil Preserved Chilies
These oil preserved chilies can stay fresh for weeks. Just make sure you store them in a cool and dry place, or best of all, refrigerate them.
Remember to use a clean and dry spoon to serve it, whenever you do.
Tips & Tricks to Nail the Recipe
- Remove the stems and discard the seeds from the chilies if you prefer a more subtle, toned-down version. I do the same when I make my green chili pickle and pickled turmeric.
- Don't discard the oil- it is actually a great flavor-infused oil that you can use to drizzle on your pizzas or use as a base for your salad dressings.
How to Use the Preserved Chilies
I love using these preserved chilies over my bruschetta or morning avocado toast. Their kick of heat makes them a great addition to your salad and rice bowls too. I also love using them as a topping over my tacos and pizzas when I run out of my pickled shredded carrots.
Another great idea is to chop up these chilies and mix them with a bit of mayonnaise to turn it into a nice dip.

Related Recipes
Looking for other recipes like this? Try these:


If you tried these pickled chilies in oil or any other recipe on my website, please leave a 🌟 star rating and let me know how it went in the 📝 comments below. Thanks for visiting!

Preserved Chilies in Oil
Ingredients
- 7-8 red chilies
- 1 tablespoon brown sugar
- 3-5 garlic
- 1 cup vinegar
- 1 teaspoon oregano
- ½ cup oil
Instructions
- Wash the chilies nicely and pat them dry.
- Thinly slice them using a sharp knife and set them aside.
- Combine vinegar and salt in a non-reactive bowl. Add the chilies and garlic and cover the bowl with cling wrap. Set this aside for a few hours.
- Drain the vinegar and pack the chilies with the garlic in a glass jar. Pour in the olive oil until all the chilies are covered.
Notes
- Remove the stems and discard the seeds from the chilies if you prefer a more subtle, toned-down version. I do the same when I make my green chili pickle and pickled turmeric.
- Don't discard the oil- it is actually a great flavor-infused oil that you can use to drizzle on your pizzas or use as a base for your salad dressings.


